版权声明:本文为博主原创文章,如果转载请给出原文链接:http://doofuu.com/article/4156181.html
很多人问微信小程序怎么上传图片?微信小程序批量上传图片、文件就跟微信小程序生成分享二维码海报一样是非常普遍的功能需求。那么如何将微信里的图片、文件、视频上传到服务器呢?昨天写了个微信小程序上传图片的案例练练手。根据WEB上传图片的经验,图片上传的方式应该是类似的,只不过调用的API不同而已。这里就以小程序上传图片到服务器为例。因为小程序上传图片、文件、视频的方式是一样的。这里就不累赘了。
首先,在微信公众号平台设置uploadFile合法域名,点击设置-开发设置,可以看到服务器域名,点击修改,设置一下你的uploadFile合法域名。
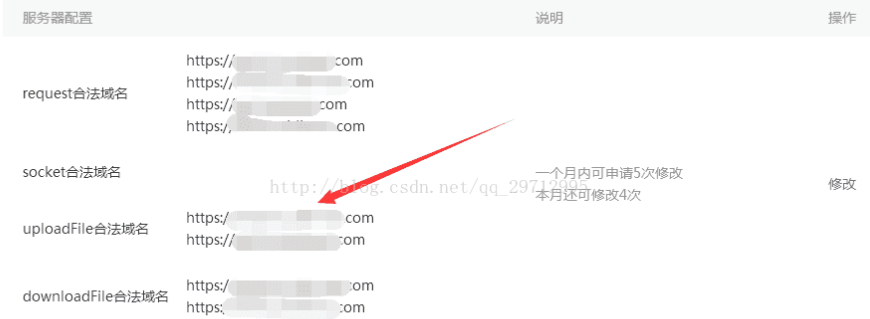
否则会出现以下域名不合法的错误(很重要)

下面代码是小程序上传图片、视频的布局代码,添加图片预览、上传按钮控件
<!--pages/upload/upload.wxml-->
<view class="img-v clearfix pad">
<view class='txt'>图片</view>
<block wx:if="{{type=='image'}}" >
  <view class="img-chooseImage" wx:for="{{imgs}}" wx:for-item="item" wx:key="*this">
    <image src="{{item}}" data-index="{{index}}" mode="aspectFill" bindtap="previewImg" class="list-img"></image>
    <view class="delete-btn" data-index="{{index}}" catchtap="deleteImg"><image  src="../../../images/close.png"></image></view>
  </view>
</block>
 <view class="upload-img-btn" bindtap="chooseImg" hidden="{{type=='image' ? ishide : false}}">
 <image class="add-img" src="../../../images/add-img.jpg"></image></view>

</view>


<view class="img-v clearfix">
<view class='txt'>视频</view>
<block wx:if="{{type=='video'}}" >
 <view class="img-chooseImage" wx:for="{{imgs}}" wx:for-item="item" wx:key="*this">
  <video  src="{{item}}" data-index="{{index}}"  bindtap="previewImg" class="list-img"></video >
  <view class="delete-btn" data-index="{{index}}" catchtap="deleteImg"><image  src="../../../images/close.png"></image></view>
 </view>
 </block>
 <view class="upload-img-btn" bindtap="addVideo" hidden="{{type=='video' ? ishide : false}}">
 <image class="add-img" src="../../../images/add-img.jpg"></image></view>

 <view class='txt-limit'>(文件大小不超过3M)</view>

</view>
 <button class="bnt" type="primary" bindtap="startUploadImg"> 开始上传 </button>
下面代码是微信小程序上传图片、视频的样式代码。
.clearfix::after {
  content: "";
  /* 内容为空 */
  visibility: hidden;
  /* 隐藏对象 */
  height: 0;
  display: block;
  clear: both;
}

.img-v{
  display: flex;
  flex-direction: column;
  align-items: center;
  justify-content: space-between;

}

.pad{
  padding-top: 90px;
}

.img-chooseImage{
  width:200rpx;
  height: 200rpx;
  float: left;
  margin-right:20rpx;
  border-radius: 8rpx;
  position: relative;
}
.delete-btn{
  position: absolute;
  right:0;
  top:0;
  width: 40rpx;
  height: 40rpx;
}
.upload-img-btn{
  width:200rpx;
  height: 200rpx;
  border:1px dashed #cccccc;
  border-radius: 8rpx;
  position: relative;
  float: left;
}
.add-img{
  width:80rpx;
  height: 80rpx;
  position: absolute;
  top:50%;
  left:50%;
  margin-top:-40rpx;
  margin-left:-40rpx;
}
.list-img{
  border:1px solid #ccc;
}
image{
  width:100%;
  height: 100%;
}

video{
  width:200rpx;
  height: 200rpx;
}

.txt{
  padding-top: 30px;
  font-size: 14px;
  color:#A9A9A9;
}

.txt-limit{
  padding-top: 5px;
  font-size: 12px;
  color:red;
}

.bnt{
  margin-top: 30px;
  margin-left: 40px;
  margin-right: 40px;
}
下面的代码是小程序上传图片、视频的主要前端逻辑代码。
chooseImg方法是通过调用wx.chooseImage({}接口从微信选择要上传的图片文件。
addVideo方法就是调用wx.chooseVideo({})接口选择要上传的视频文件。
startUploadImg方法的主要逻辑是把选择的微信小程序图片、视频通过网络上传到服务器
Page({

  /**
   * 页面的初始数据
   */
  data: {
    imgs: [],
    type: '',
    ishide: false
  },

  chooseImg: function (e) {
    var that = this;
    var imgs = this.data.imgs;
    wx.chooseImage({
      sizeType: ['original', 'compressed'], // 可以指定是原图还是压缩图,默认二者都有
      sourceType: ['album', 'camera'], // 可以指定来源是相册还是相机,默认二者都有
      success: function (res) {
        // 返回选定照片的本地文件路径列表,tempFilePath可以作为img标签的src属性显示图片
        var tempFilePaths = res.tempFilePaths;
        if (res.tempFiles[0].size > 3145728){
          wx.showToast({
            title: '文件不能超过3M',
            mask: true,
            duration: 1000
          })
          return ;

        }
        console.log('----' + tempFilePaths);

        that.setData({
          imgs: [tempFilePaths[0]],
          ishide: true,
          type:'image'
        });

      }
    });
  },

  addVideo: function () {
    var that = this
    wx.chooseVideo({
      sourceType: ['album', 'camera'],
      maxDuration: 60,
      camera: 'back',
      success: function (res) {
        if (res.size > 3145728) {
          wx.showToast({
            title: '视频不能超过3M',
            mask: true,
            duration: 1000
          })
          return;
        }
        that.setData({
          imgs: [res.tempFilePath],
          ishide: true,
          type: 'video'
        })
      }
    })
  },

startUploadImg : function(e){
  var that = this;
  var imgs = this.data.imgs;

  if (imgs.length <= 0){
    wx.showToast({
      title: '请选择上传文件!',
      mask: true,
      duration: 1000
    })
    return
  }

  wx.showLoading({
    title: '正在上传...',
    mask: true
  })
    //上传文件
    wx.uploadFile({
      url: app.d.Url + '/Api/Upload/upload',
      filePath: imgs[0],
      formData: { uid: uid},
      name: 'img',
      header: {
        "Content-Type": "multipart/form-data"
      },
      success: function (res) {
        wx.hideLoading();
        console.log('uploadImage success, res is:', res);
        var statusCode = res.statusCode;
        if (statusCode == 200) {
          that.deleteImgByIndex(0)
          wx.showToast({
            title: '上传成功',
            icon: 'success',
            duration: 2000
          })
        }
      },
      fail: function ({ errMsg}) {
        console.log('uploadImage fail, errMsg is', errMsg)
        wx.hideLoading();
        wx.showModal({
          title: '错误提示',
          content: '上传失败',
          showCancel: false,
          success: function (res) { }
        })
      }
    });

}
})
下面是服务端接受小程序上传的图片、视频并保存在服务端本地的逻辑代码。到这一步时就跟WEB上传文件是一样的了。还不懂的话就自己百度下吧。
<?php
namespace Api\Controller;
use Think\Controller;
class UploadController extends PublicController {
    //***************************
    //  上传数据接口
    //***************************
    public function upload(){

        $data = array();
        $info = $this->upload_images($_FILES['img'],array(),"Uploads/".date(Ymd));
        if(is_array($info)) {// 上传错误提示错误信息

            $url = 'UploadFiles/'.$info['savepath'].$info['savename'];
            if ($_REQUEST['imgs']) {
                $img_url = "Data/".$_REQUEST['imgs'];
                if(file_exists($img_url)) {
                    @unlink($img_url);
                }
            }
            echo urldecode(json_encode(array('status'=>1,'err'=>'上传成功!')));
            exit();
        }else{
            echo urldecode(json_encode(array('status'=>0)));
            exit();
        }
    }

    /*
    *
    * 图片上传的公共方法
    *  $file 文件数据流 $exts 文件类型 $path 子目录名称
    */
    public function upload_images($file,$exts,$path){
        $upload = new \Think\Upload();// 实例化上传类
        $upload->maxSize   =  3145728 ;// 设置附件上传大小3M
        $upload->exts      =  $exts;// 设置附件上传类型
        $upload->rootPath  =  './Data/UploadFiles/'; // 设置附件上传根目录
        $upload->savePath  =  ''; // 设置附件上传(子)目录
        $upload->saveName = time().mt_rand(100000,999999); //文件名称创建时间戳+随机数
        $upload->autoSub  = true; //自动使用子目录保存上传文件 默认为true
        $upload->subName  = $path; //子目录创建方式,采用数组或者字符串方式定义
        // 上传文件
        $info = $upload->uploadOne($file);
        if(!$info) {// 上传错误提示错误信息
            return $upload->getError();
        }else{// 上传成功 获取上传文件信息
            //return 'UploadFiles/'.$file['savepath'].$file['savename'];
            return $info;
        }
    }
}
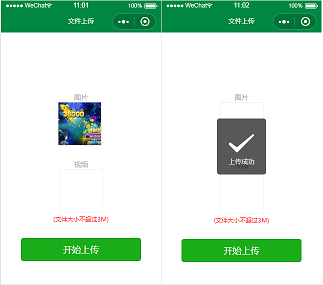
如果是多图片的话。其实就是通过循环一张一张的上传到服务器。由于微信小程序的限制。在手机端还不能上传视频,只能上传图片,在开发工具是没有问题的。由于给客户开发小程序时间比较紧。界面和代码质量都比较随意。最后看下效果吧!









共有 0 条评论 - 微信小程序上传图片、文件、视频及小程序批量上传