版权声明:本文为博主原创文章,如果转载请给出原文链接:http://doofuu.com/article/4156146.html
由于二维码在日常中的方便和实用性。在很多的业务需求中都需要生成二维码,尤其是在小程序开发中,想象下扫下二维码就能让用户去到小程序指定的活动页面,指定的商品页面,或者是我的推广页面,甚至是小程序任意页面。这是多么令人兴奋的事。这都是二维码的魅力。本文用是用PHP实现生成微信小程序带参数二维码,以及讲解在开发过程中要避免的坑。
闲话不多说,干就完了~
小程序二维码介绍
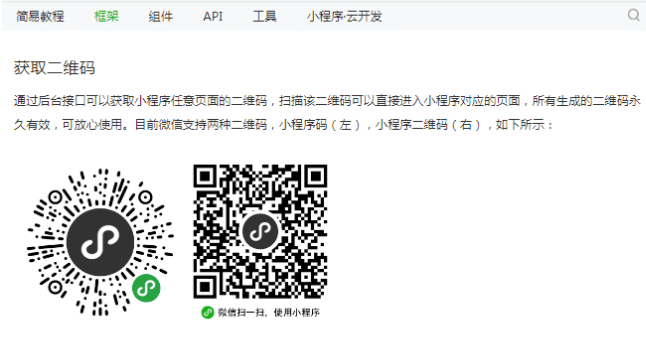
从微信小程序开发文档上我们可以了解到,目前微信支持两种二维码,小程序码(左)和小程序二维码(右)。官方推荐使用小程序码,因为小程序码具有更好的辨识度。

官方分别提供下面三种生成小程序码方式:
wxacode.get
该接口适用于需要的码数量较少的业务场景。通过该接口生成的小程序码,永久有效,有数量限制,支持HTTPS和云调用,具体参数和API在这里
wxacode.createQRCode
该接口适用于需要的码数量较少的业务场景。通过该接口生成的小程序码,永久有效,有数量限制,支持HTTPS和云调用,具体参数和API在这里
wxacode.getUnlimited
该接口适用于需要的码数量较少的业务场景。通过该接口生成的小程序码,永久有效,无数量限制,支持HTTPS
和云调用,具体参数和API在这里
由于自己的业务需求我选择了wxacode.getUnlimited这种方式。下面贴下我的代码吧
//生成二维码
    public function poster(){
        $path = $_REQUEST['path'];    //跳转路径
	$pid = intval($_REQUEST['pid']);//参数
	$scene = $pid;
        $this->getAccessToken();
        $result = $this->getXcxCode($scene,$path);
	if(!$result){
		echo json_encode(array('status'=>0,'err'=>'生成失败!'));
		exit();
	}
	$info = array(
    	    'code'=>__DATAURL__.'UploadFiles/code/'.$result
	);

	echo json_encode(array('status'=>1,'info'=>$info));
	exit();
	}

    //获取token缓存起来
    public function getAccessToken(){
        $appId = C('weixin.appid');//小程序appid
        $secret = C('weixin.secret');//小程序secret
        //创建请求数据
        $url_token="https://api.weixin.qq.com/cgi-bin/token?grant_type=client_credential&appid={$appId}&secret={$secret}";
        $data_result = $this->curl_post_https($url_token);
        $data = json_decode($data_result,TRUE);
        $token = $data['access_token'];
        session('expires_in',time() + $data['expires_in']);
        session('token',$token);
    }


    //拿到token获取二维码
    public function getXcxCode($scene,$path){
        $token = session('token');
        if ($token) {
		$expires_in = session('expires_in');
		if($expires_in && $expires_in > time()){
		    $accessToken= $token;
		}else{
		    $accessToken = $this->getAccessToken();
		}
        }else{
            $accessToken = $this->getAccessToken();
        }


        $url="https://api.weixin.qq.com/wxa/getwxacodeunlimit?access_token={$accessToken}";
        $data=[
            'scene'=>$scene,
            'page'=>$path,
            'width'=>430,
            'auto_color'=>false,
        ];
        $data=json_encode($data);
        //拿到二维码
        $result = $this->curl_post_https($url,$data);
		//var_dump($result);
		if(!$result || $this->is_json($result)){
			return false;
		}

        //把二维码存到服务器端
        $res = $this->UploadImageQrCode($result);
        return $res;
    }

	public function is_json($string) {
		json_decode($string);
		return (json_last_error() == JSON_ERROR_NONE);
	}


    // 图片上传
    public function UploadImageQrCode($img){
        $saveimgfile_1 = './Data/UploadFiles/code/';
        $fileimgname = time()."-".rand(1000,9999).".png";
        $filecachs = $saveimgfile_1.$fileimgname;
        $fanhuistr = file_put_contents( $filecachs,$img);
        return $fileimgname;
    }

    // 模拟post进行url请求
    public function curl_post_https($url,$data){
        $ch = curl_init();
        $header = "Accept-Charset: utf-8";
        curl_setopt($ch, CURLOPT_URL, $url);
        curl_setopt($ch, CURLOPT_CUSTOMREQUEST, "POST");
        curl_setopt($ch, CURLOPT_SSL_VERIFYPEER, FALSE);
        curl_setopt($ch, CURLOPT_SSL_VERIFYHOST, FALSE);
        curl_setopt($ch, CURLOPT_HTTPHEADER, $header);
        curl_setopt($ch, CURLOPT_USERAGENT, 'Mozilla/5.0 (compatible; MSIE 5.01; Windows NT 5.0)');
        curl_setopt($ch, CURLOPT_FOLLOWLOCATION, 1);
        curl_setopt($ch, CURLOPT_AUTOREFERER, 1);
        curl_setopt($ch, CURLOPT_POSTFIELDS, $data);
        curl_setopt($ch, CURLOPT_RETURNTRANSFER,true);
        $tmpInfo = curl_exec($ch);
        if (curl_errno($ch)) {
            return false;
        }else{
            return $tmpInfo;
        }
}由于access_token是有过期时间,如果在未过期的情况下重复请求会报错,所以在拿到access_token后加了缓存判断。
需要注意生成二维码的两个参数scene和path(新手必看、必踩的坑)
page:必须是已经发布的小程序存在的页面(否则报错),例如 pages/index/index, 根路径前不要填加 /,不能携带参数(参数请放在scene字段里),如果不填写这个字段,默认跳主页面
scene:最大32个可见字符,只支持数字,大小写英文以及部分特殊字符:!#$&'()*+,/:;=?@-._~,其它字符请自行编码为合法字符(因不支持%,中文无法使用 urlencode 处理,请使用其他编码方式)
而且在小程序onLoad 的时候 需要使用 decodeURIComponent 才能获取到生成二维码时传入的 scene
Page({
  onLoad (query) {
    // scene 需要使用 decodeURIComponent 才能获取到生成二维码时传入的 scene
    const scene = decodeURIComponent(query.scene)
}})有个麻烦的地方是,如果你传递的scene 参数是“a=1&b=1”,那么在encodeURIComponent出来后的结果也是“a=1&b=1”,获取a、b对应的值就需要自己对字符串去做处理了。
总结:一定要仔细的阅读官方文档和参数说明,这很重要!这很重要!这很重要!
一天没出去了,外面还下着大雨。今天就写到这里吧。


共有 0 条评论 - 详解微信小程序带参数二维码的生成以及参数的获取